


12V Powered Wheels Motor Gearbox Replacement 2 Pcs RS550 40000RPM High Speed Upgrade Set Compatible with Most Ride On Toys, Kids Electric Cars for Powered Wheels Replacement Parts

 4.2 (144 items)
 Limited Time Sale
US$19.79 cheaper than the new price!!
Free cash-on-delivery fees for purchases over $99
Product details
| Management number | 218714794 | Release Date | 2026/05/03 | List Price | US$13.20 | Model Number | 218714794 | ||
|---|---|---|---|---|---|---|---|---|---|
| Category | |||||||||
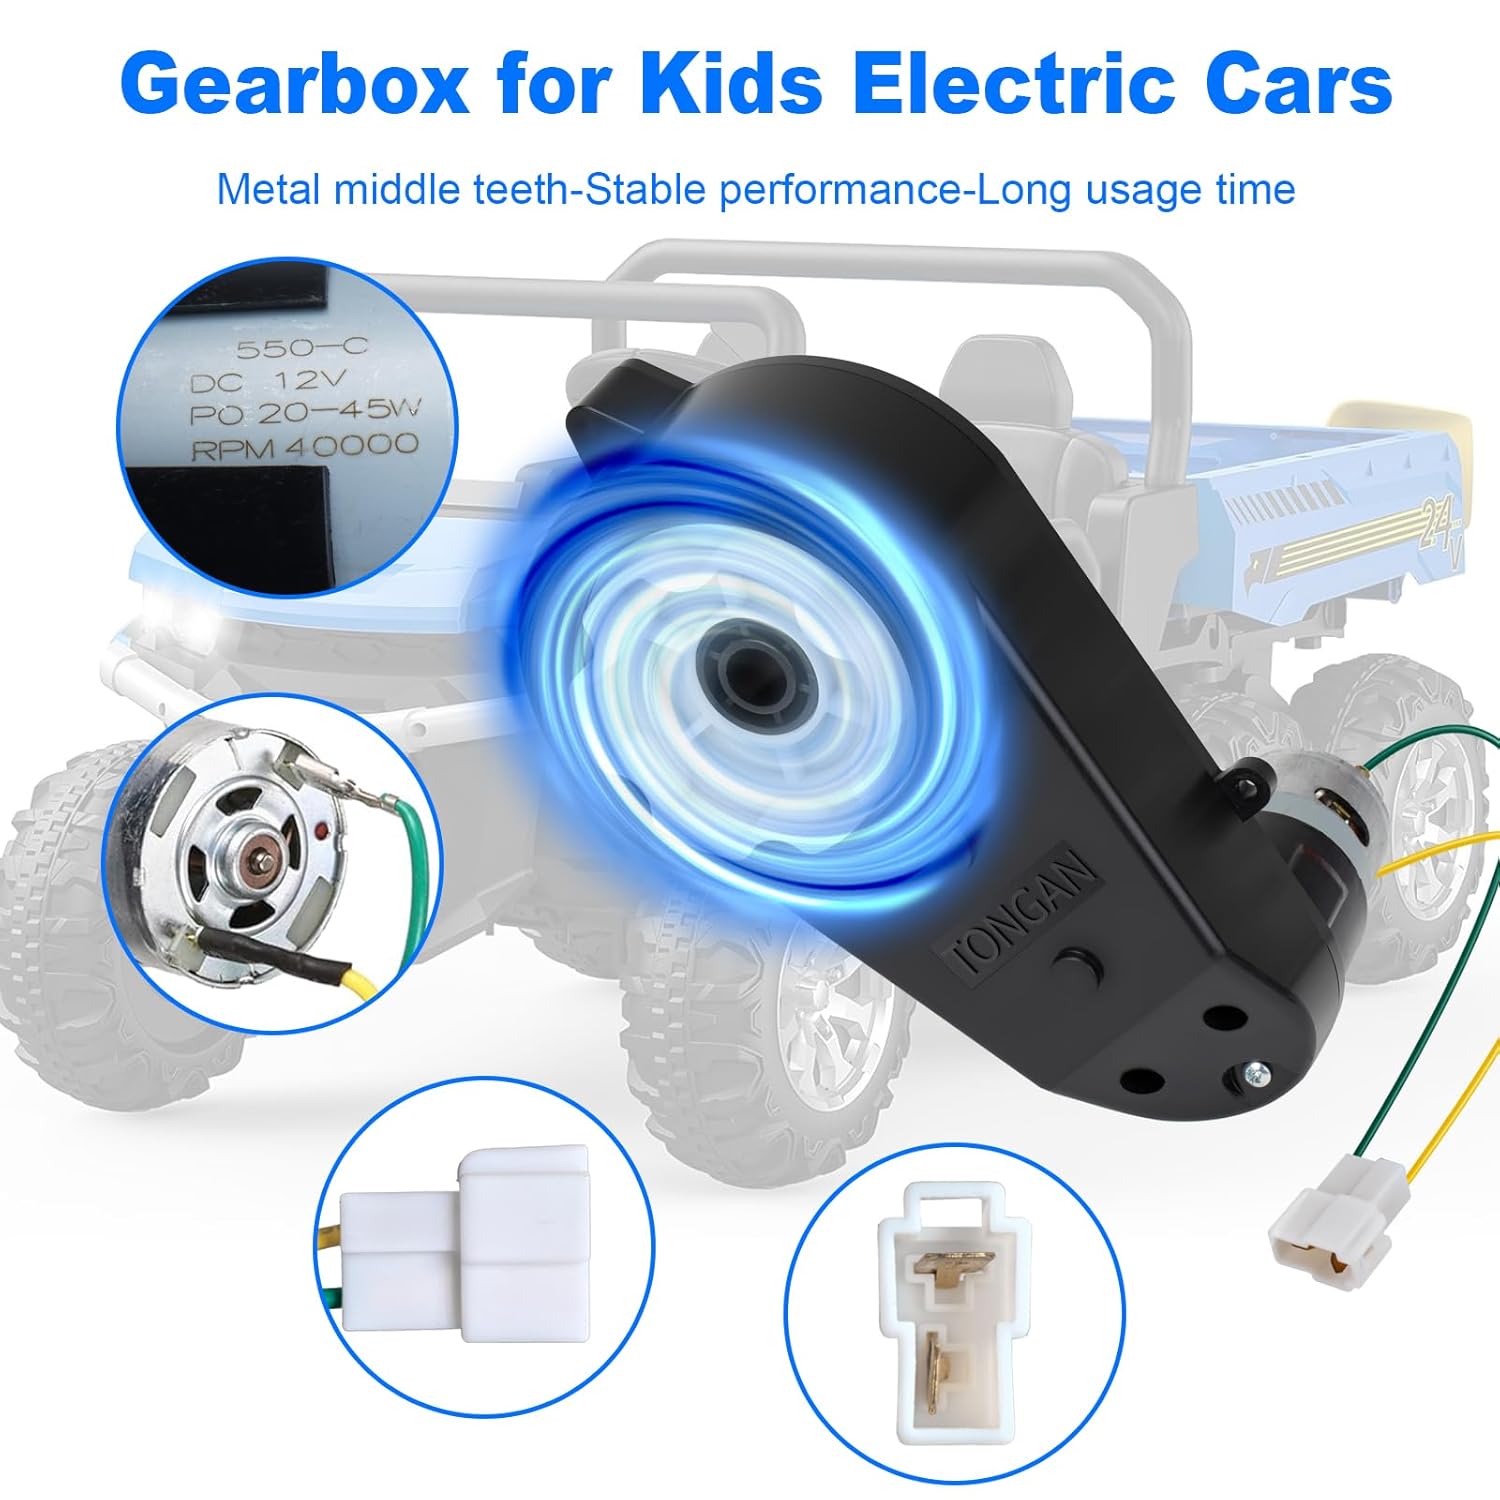
12V Kids' Ride-On Car Motor Kit Proper pre-installation preparation is key to ensuring your 12V motor kit fits quickly and safely, avoiding installation mistakes, damaged parts, or harm to your kid’s ride-on car. Designed for busy parents with no professional repair experience, this guide walks you through simple checks and preparations for your 12V 550 motor gearbox kit, so you can start the 15-20 minute quick installation effortlessly and get your child’s favorite toy back up and running in no time—stress-free from start to finish. I. Tool Preparation: Minimal, Household Items Are All You Need No professional or complicated tools are required for installing this 12V replacement motor kit. Gather the basic tools below to smoothly complete disassembly and installation of your kids' ride-on car motor, preventing issues like stripped screws or improper fitting caused by mismatched tools—balancing convenience and safety. Phillips Head Screwdriver: A must-have core tool for installing your 12V 550 motor gearbox. We recommend a medium size (compatible with most screws on kids' ride-on cars, ATVs, and UTVs), preferably with a non-slip handle for easier removal of chassis and motor mounting screws. This helps avoid hand slippage and scratches during use of your replacement motor kit. Adjustable Wrench (Optional): If the chassis screws are tight or there are locking nuts, pair with a small adjustable wrench for assistance. No need for a large size—one that adjusts easily to fit different nut sizes works perfectly. Avoid over-tightening to prevent damage to screws or the chassis. Flashlight/Phone Flash: The chassis space of kids' ride-on cars is narrow, and some wiring and screw positions may be poorly lit. Use a flashlight or turn on your phone’s flash to clearly see internal wiring connectors and mounting holes, avoiding accidental contact with wires or missing screws. Spare Cloth (Optional): The car’s chassis is constantly in contact with the ground and tends to accumulate dust and dirt. Wipe the mounting area and motor surface lightly with a cloth before installation to prevent dust from entering the motor gearbox, extend the motor’s service life, and ensure a tight fit during installation. ⚠️ Friendly Reminder: No power drills, welding tools, or other professional equipment are needed. This 12V motor gearbox set is a direct OEM replacement for most 12V kids' ride-on cars, so no drilling or modifications are required. Avoid damaging your car or motor by using professional tools incorrectly. II. Comprehensive Vehicle Inspection: Eliminate Risks, Ensure Installation Safety Before installation, fully inspect the kids' ride-on car to confirm there is no damage or electrical hazards—critical for protecting your new 12V replacement motor kit. This lays a safe foundation for motor replacement and prevents the new 12V 550 motor from malfunctioning due to pre-existing issues with the vehicle itself. 1. Complete Power Disconnection (Critical Step): First, turn off the ride-on car’s power switch. Then, unplug the internal battery connector (or remove the battery) and wait 3-5 minutes to ensure the vehicle’s electrical system is completely powered down before proceeding. This prevents short circuits during wire disassembly, avoids burning the new 12V motor gearbox or the original vehicle’s electrical system, and ensures the safety of the person installing—eliminating electric shock risks entirely. 2. Chassis & Mounting Area Inspection: Flip the vehicle over (use a stand to secure it and prevent tipping). Check for obvious damage, cracks, or missing screws on the chassis. Focus on the motor mounting areas (left and right sides) to ensure the mounting surface is flat and undamaged, and the mounting screw holes are not stripped or blocked. Clean any dust or debris if present to ensure the new motor fits smoothly and bolts can be secured properly. 3. Transmission Component Inspection: Check that the vehicle’s drive wheels and drive shaft rotate smoothly without jamming or looseness. If the drive wheels jam, clean any debris or adjust them first. This prevents the new motor from overloading and burning out due to blocked transmission after installation, which would affect performance and service life. III. Wiring & Component Check: Precise Matching, Avoid Installation Delays This 12V motor gearbox kit comes with pre-wired connectors, so no additional wiring is needed. However, check the wiring connectors and component completeness before installation to ensure perfect compatibility with your original 12V kids' ride-on car—avoiding installation delays caused by mismatched connectors or missing parts. Pre-Wired Connector Check: Take out the left and right 12V 550 motors from the new motor kit. Check the style and size of the pre-wired connectors and compare them with the original motor’s wiring connectors to ensure they match perfectly (this 12V replacement motor kit’s connectors are universal and compatible with most 12V kids' ride-on cars, ATVs, and UTVs, except for vehicles with custom connectors). Component Completeness Check: Verify that all parts in the 12V replacement motor kit are present and undamaged, including 2x12V RS550 motor gearboxes (1 left, 1 right), pre-wired harnesses. Pre-Confirm Positive & Negative Polarity: While the kit’s pre-wired connectors can be plugged in directly, we recommend confirming the positive and negative polarity of the original motor’s wires first (usually red = positive, black = negative) and matching them to the new motor’s pre-wired polarity. This ensures the motor rotates forward and backward correctly after connection, avoiding abnormal vehicle direction due to reversed polarity (if reversed, adjust the connector orientation—no wire cutting required).
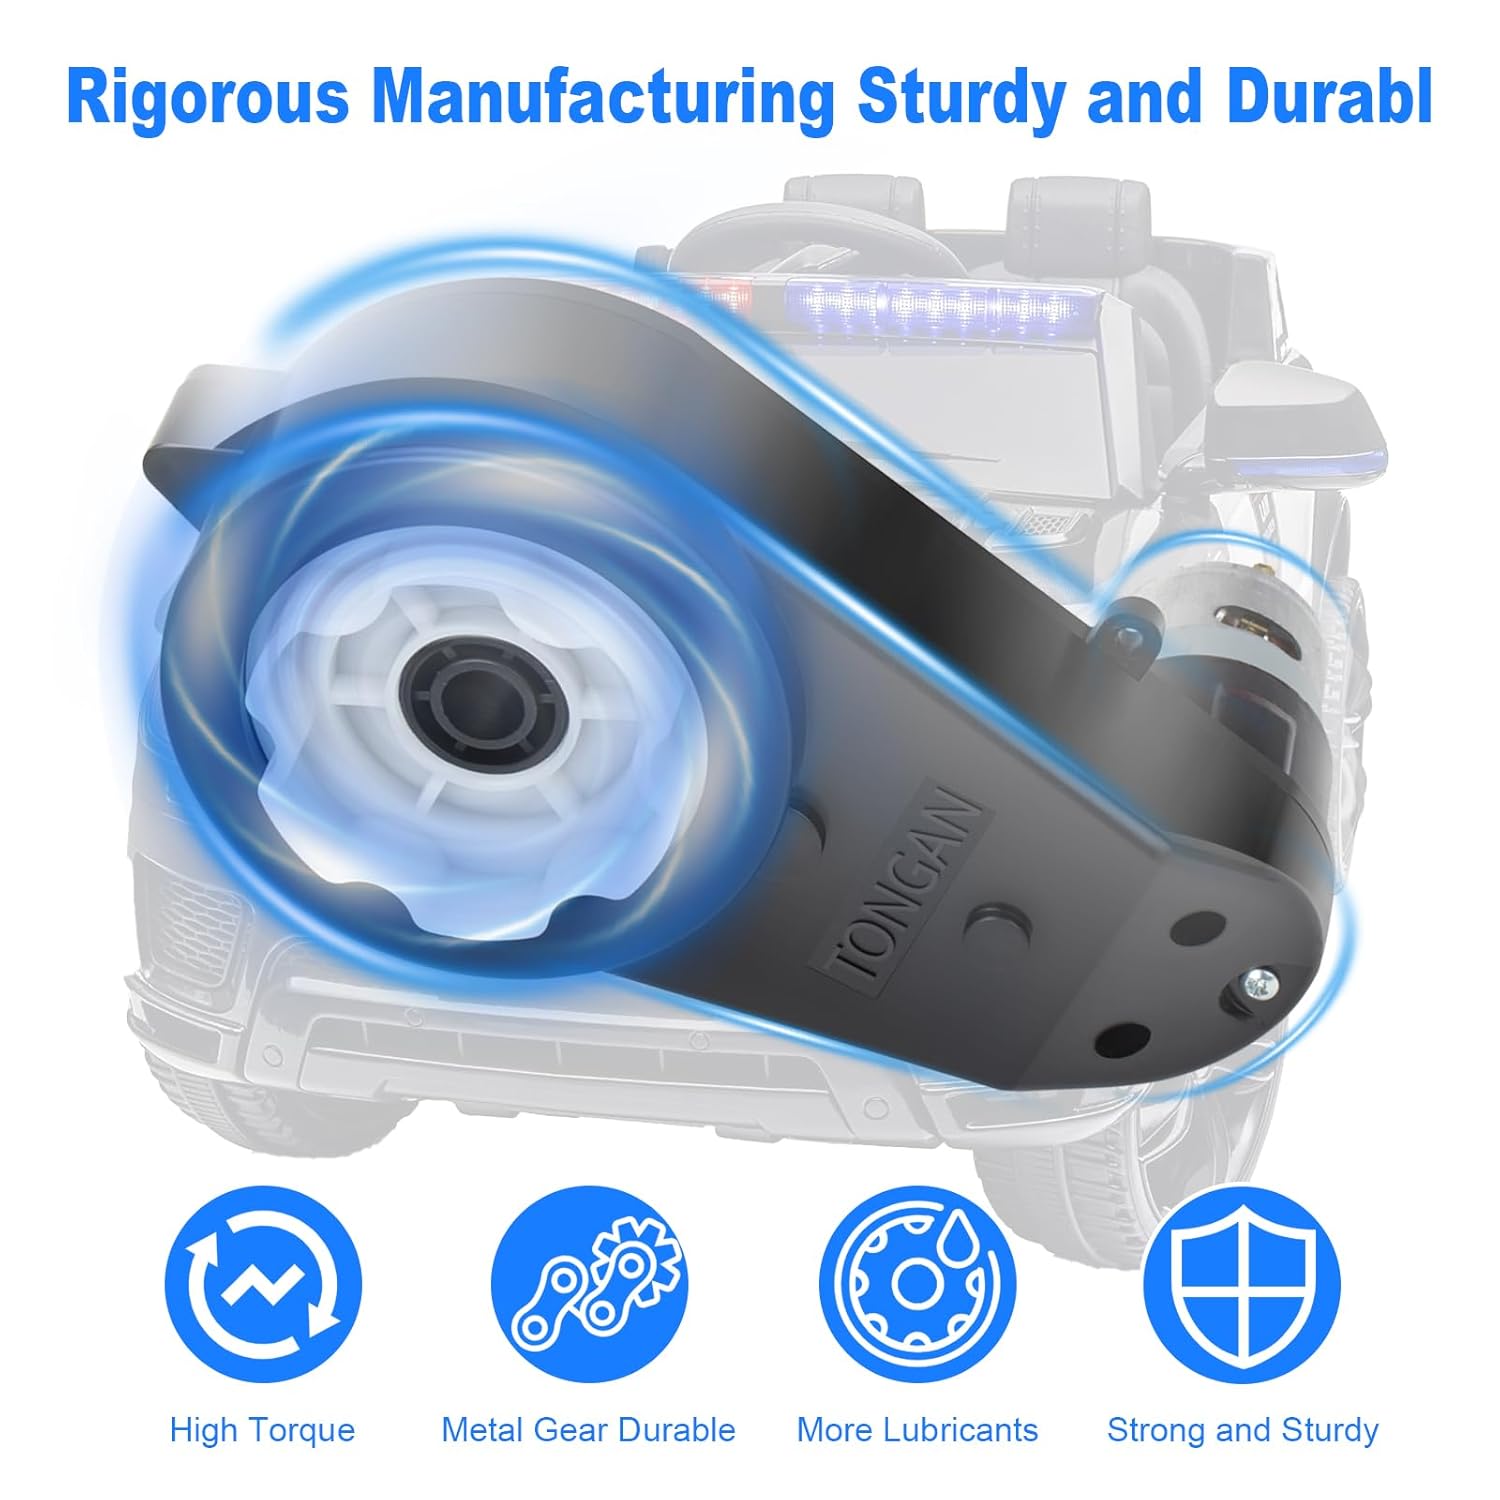
- Universal Compatibility:12V gearbox motor set is engineered as a direct replacement for most 12V kids' ride-on cars, ATVs, and UTVs. The 12mm shaft hole and 35mm motor diameter perfectly match OEM specs, so you can bolt it right into your vehicle's original mounting points without drilling or modifications
- 2Pcs 12V550 Motor Gearbox:12V55040000RPM High Speed drive motor gearbox ,Voltage: DC 12V; Speed: 40000RPM ;Shaft Hole Diameter: 12mm (0.47"); Motor Diameter: 35mm(1.38")
- Complete Left Right Assembly:Both left and right gearbox assemblies, plus pre-wired connectors for a hassle-free installation. In just 15-20 minutes, you'll have your kid's favorite toy back up and running
- 40000RPM High-Speed Power:Boasting a 40000RPM high-speed motor, this replacement kit delivers consistent, powerful torque that lets your child'sride-on car climb hills, tackle grass, and cruise over rough terrain with ease. It's built to handle the demands of active playtime
- Durable Kid-Tested Build:Made from high-impact, kid-tough plastic and a rugged metal motor, this gearbox set is built to withstand the bumps, jumps, and daily wear and tear of kids' play
| Brand Name | Generic |
|---|---|
| Unit Count | 2.0 Count |
| Item Weight | 2.3 Pounds |
| Part Number | 001 |
| Manufacturer | Generic |
Bestseller ranking
Babysitting, Day Care & Child Care

Customers who viewed this product also viewed
TV Antennas


Correction of product information
If you notice any omissions or errors in the product information on this page, please use the correction request form below.
Correction Request Form